Spider
Local Delivery Truck Driver

Posts: 302
|
Post by Spider on Nov 7, 2007 13:35:31 GMT -5
Hi: Maybe someone can help here. I'm building a newer release AMT Dozer kit, it has no plated parts, all parts are molded in gray. I want to build the hydraulic rams for the blade but not really sure how to go about getting the ram section to look like a chromed finish. My first thoughts are to paint the rams black and top coat with Alclad II Chrome, then assemble and push rams into the cylinders to paint those yellow. I'm not sure how the Alclad will handle this though, being how delicate this chrome finish is. I don't think silver will cut it, as this parts would definitely be a very clean and shinny finish.
Considering how bad the instructions are, things are going rather well so far.
|
|
|
|
Post by crashalot2 on Nov 7, 2007 19:19:20 GMT -5
You could replace the ram parts with aluminum tube.
|
|
|
|
Post by roadwarrior on Nov 8, 2007 10:48:22 GMT -5
|
|
Rustycab
Local Delivery Truck Driver
The one with the most toys - Die's too!
Posts: 379
|
Post by Rustycab on Nov 8, 2007 19:34:51 GMT -5
You could replace the ram parts with aluminum tube. this would be the easiest and in my opinion just as good ( polish the aluminum ) |
|
Spider
Local Delivery Truck Driver
Posts: 302
|
Post by Spider on Nov 9, 2007 22:12:21 GMT -5
OK, I decided to give the Alclad Chrome a try for the blade and ripper hydraulic rams. If it doesn't hold up I'll do a fix by hand with another paint. I looked at the parts and suppose I could fabricate the front rams but I'm not sure it would be worth the time. Considering I plan on dirtying up the whole thing and putting it on my lowboy trailer. All I need is to get the rams so they look in good shape and used (as they would be on a functioning dozer).
Any suggestions on a finish for the blade and ripper face that would resemble the polished look a blade has from constant pushing of dirt and stone? I was thinking of Steel paint with maybe some Titanium Sliver for slightly darker areas.
My plan is to make the floor plate, at the driver compartment, look like a rubbed bare steel and the exhaust stack in steel.
I'm open for suggestions,as my builds go through plan changes all the time until I finish them.
Thanks for your time.
|
|
dptydawg
Local Delivery Truck Driver
Posts: 41
|
Post by dptydawg on Nov 10, 2007 21:10:30 GMT -5
Hi Spider,
For your deck plates I would consider some dark washes first to show dirt in less traveled areas, then dry brush it with silver/steel/gunmetal to highlight the worn areas. Dry brushing will pick out the checker plate detail nicely
Carl
|
|
|
|
Post by dieseldoc on Nov 11, 2007 11:07:44 GMT -5
For the blade I would base coat it in steel first, once the steel is dry spray on a coat of rust color completely covering the steel. With all of that dry over coat these with the yellow color coat the the rest of the dozer is painted. When this is dry the fun part comes in. Using course sand paper, the tip of a hobby knife or what ever means your imagination can come up with scratch up the dozer blade to replicated the degree of wear you are looking for. Should you go through to the kit plastic this can be touched up with the steel paint you started with. When you get the blade worn to your liking give it a heavy sludge wash with earth toned oil paints. Let the oils set up for about a 1/2 hour then wipe away the excess with a paper towel in the dirstion the dirt would roll off of the blade as if the dozer were pushing dirt. The reason for the oil paint wash is because oils are heavy and they will look like clumped on dirt around the bolts or rivet detail.
I think your route of using alclad for the ram pistons will work out fine. Should the alclad scratch from working the rams it will add another level of realism. On 1:1 rams if you really look ot them the chome plating is scratched perpindicular to the piston from dirt that collects on them. In some cases you will even find pitting.
|
|
Spider
Local Delivery Truck Driver
Posts: 302
|
Post by Spider on Nov 11, 2007 13:23:51 GMT -5
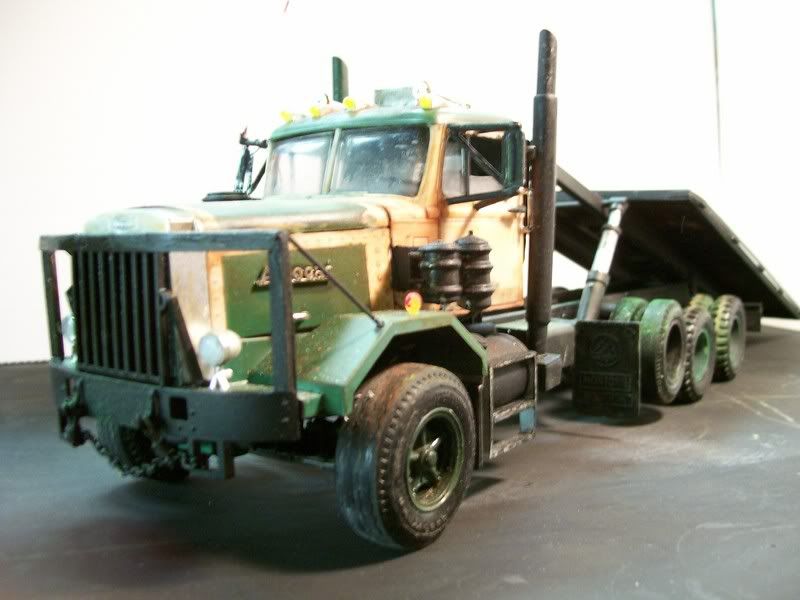
I have never weathered anything before and this is something different. I think the engine got pretty good. I'm not worrying much about how nice a finish I'm getting with the CAT Yellow base for the majority of parts. It will get crudded up anyway and I figure that any imperfections will just add a texture anyway. I'm not sure what I'll do with the blade yet but the suggestion above sounds like it would work. I may try that or a variation and I do appreciate the time for the reply. Right now the entire blade assembly is in CAT Yellow and it will be at least a few days before this dries enough to handle it without really messing things up. I painted the drive wheels, rollers, and tracks with steel, then a light mist of medium gray, then a light mist of rust. I also speckled some rust and then patted it with paper towel to make the shapes look irregular. The drivers area floow was dry brushed with steel and rust then steel again in the areas I felt would be worn the most. I'm happy so far with the results. I did do the Alclad II Chrome for the rams and I think it turned out pretty well. I have the housings glued now and will do a little trimming when dry then paint them yellow. I want to do spot weathering before some assembly then dirty the whole thing up afer its all together. I figure that way I can make sure areas are flowing in color and not real spooty difference that don't look right. I may be going about this correctly or completely wrong but I'll learn something for this project for the future. Here are a few pictures as things stand so far: |
|
|
|
Post by dieseldoc on Nov 11, 2007 17:59:44 GMT -5
A suggestion here, for what you are trying to accomplish your off to a good start. Although your parts are a little to shiney so far, spray them with light coats of Testors dull coat. This will also help to even things out. You also may want to brush some modelmasters burnt iron metalizer onto the exhaust manifold and exhaust side of the turbo
|
|
Spider
Local Delivery Truck Driver
Posts: 302
|
Post by Spider on Nov 18, 2007 10:59:24 GMT -5
For my first try at weathering, I'm satisfied with the results. I know there is much room for improvement but overall, things went pretty well. I did screw up with one thing but made it work out. I misinterpreted the instructions (imagine that with this kit) and got the wing pieces of the ripper mount on facing the wrong direction. It was impossible to get them back apart so I just used that way and fabricated two support sections to the top of the lift ram frames. The ripper sits back away from the dozer a fair amount but I think it looks alright like it is. I need to finish up the trailer it goes on then I'll have pictures of the whole rig. For now here are a few pictures of the dozer. How did I do? I'd appreciated honest opinions on the weathering so I can judge what I might do the next time. |
|
Rustycab
Local Delivery Truck Driver
The one with the most toys - Die's too!
Posts: 379
|
Post by Rustycab on Nov 18, 2007 13:12:51 GMT -5
I think it looks Excellent
|
|
|
|
Post by crashalot2 on Nov 18, 2007 17:19:32 GMT -5
very good
|
|
cfnutcase
Local Delivery Truck Driver
Posts: 300
|
Post by cfnutcase on Nov 18, 2007 23:41:38 GMT -5
Fantastic!! Jim
|
|
|
|
Post by dieseldoc on Nov 21, 2007 0:28:49 GMT -5
it looks well used. This came together very nice
|
|
locoengr
Local Delivery Truck Driver
Gluebombs Inc.
Posts: 276
|
Post by locoengr on Nov 21, 2007 14:06:12 GMT -5
"Satisfied with the results" is your opinion? I'd be friggin' extactic if I had your talents. GR8 job!!
|
|